The Adtelligence Personalization Engine combines big data with user experience management, machine-learning and predictive analytics to enable personalization at scale. It’s a powerful solution for enterprise customers who want to lead the digital transformation in their industry.
Key benefits
15-30% higher revenues in less than 6 months
80% time saving for implementation of new ideas
Provide more flexibility for Shop and Category Managers
Reduction of costs with previews and approval before implementation
Reduction of risk by testing several experiences and variations
Higher revenues through automated optimization
Personalization Plugin
The plugin offers all necessary functions to enable the connection to Adtelligence Personalization Engine.
Key benefits
Direct Import to IBM Developerstudio (RAD)
Includes all necessary sources
Possibility to integrate JavaScript classes directly in source files or reference to external hosted code
Includes Webshop examples
If you have problems or questions during the installation, please write an e-mail to ibm@acceleraida.ai.
2. Adtelligence Personalization Engine plugin
The Personalization plugin seamlessly integrates the Adtelligence Personalization Engine with WebSphere Commerce, empowering marketers to start optimizing user experiences right from their shop cockpit.
With the Personalization plugin you enable your shop to leverage marketing, context, shop, user and customer data to optimize user experiences in real-time.
The Adtelligence Personalization Engine combines big data with user experience management, machine-learning and predictive analytics to enable personalization at scale.
The Adtelligence Personalization Engine can also be integrated with other IBM marketing and analytics technologies, enabling you to personalize your users’ omni-channel customer experience.
2.1 Plugin compilation in Eclipse/IBM Developerstudio (RAD)
The plugin project can be compiled into a deployable file in IBM Developer Studio or most Eclipse J2EE IDEs. This section describes in detail how to create a deployable war file.
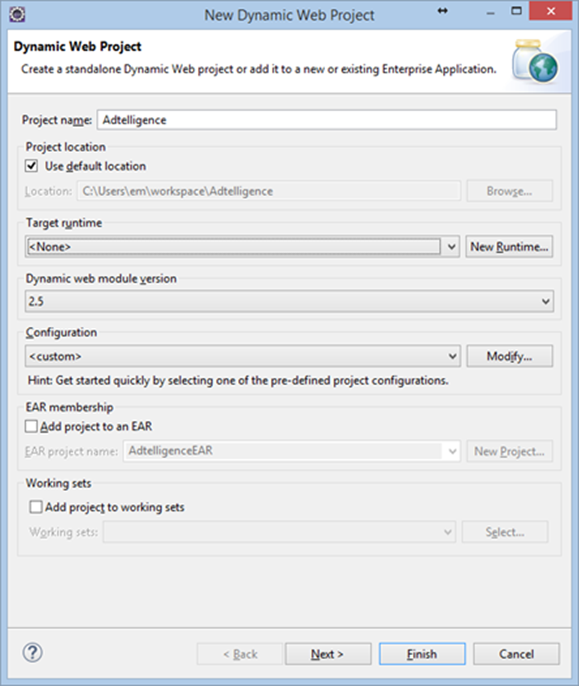
Start IBM Developer Studio or Eclipse and create a “dynamic Webproject” with the name “Adtelligence“.
Step 1
Please adapt the process of project creation according to the following pictures.
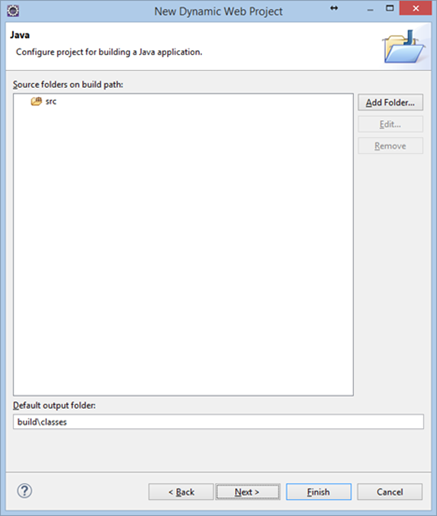
Step 2
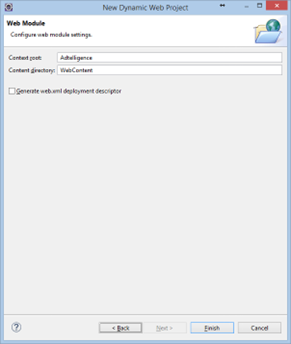
Step 3
Please disable the option to “Generate web.xml deployment descriptor” and close the wizard by clicking “Finish”.
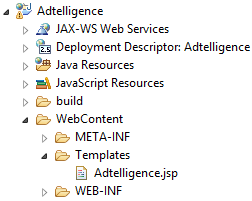
Please create a directory “Templates” under “WebContent” in your project. Next step is to create a file “Adtelligence.jsp“ in the folder “Templates”.
2.1.1 Script integration
There are two ways to integrate the plugin in this project. Either you integrate a given script “epcd.js” directly into the project (internal script) or add a link to a provided script (external script). One way must be chosen to be referenced in “Adtelligence.jsp”
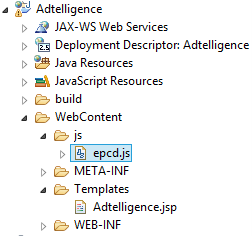
2.1.2 Integration for internal script
Please create a directory “js” under ”WebContent” in your project and add the existing file “epcd.js” in the directory.
To reference the internal script in the template file „Adtelligence.jsp“, please insert the following code to „Adtelligence.jsp“:
2.1.3 Integration for external script
To integrate the external script you just have to add the following code section to Template-File „Adtelligence.jsp“:
The link in the last line of the code section might need to be changed by Adtelligence Project Management.
2.2 Integration Plugin Creation
The Webproject must be exported after the script and the template are updated. Export can be triggered by a right-click on the project (Export à WAR File).
Choose your destination and close the dialog with “Finish”.
3. Plugin installation in Eclipse/IBM Developerstudio (RAD)
To import the plugin in your project you have to include the compiled plugin in Eclipse/IBM Developerstudio (RAD).
Open your project and rightclick in Enterprise Explorer View and choose “Importà WAR File”.
Please be sure you enabled “Add project to an EAR”. This adds the plugin to the deployment and changes the file application.xml of your project accordingly. If you are not sure, please check import by manually adding the WAR File with these steps:
If the plugin may not be included correctly in the project, the assembly must be added to the Deployment of your project by rightclicking on the project and selecting WC-ProjectàProperties à Deployment Assemblyà Addà Adtelligence. Now the file Adtelligence.war should be listed in the Deployment Assembly.
After this step the WAR File needs to be added to the deployment descriptor. Therefore, you have to open the application.xml file in the directory /WC/META-INF/application.xml (Modules à Add à Adtelligence.war)
Furthermore, after opening the file application.xml in Source mode the context-root property must be changed according to the following code:
4. Using the plugin
The Plugin can now be used in the WebSphere Commerce Project in every template. Here is an example to add variables like userid, storeid, usertype, catalogid, which can be extended with variables like shopping cart value or other variables.
The code is assuming the script reads from the gconfig variable which includes the data items defined in the last code sample.
Depending on your implementation, different shop data is available, e.g.: locale, langID, orderAmount, userID, storeName, storeID, userType, catalogID, orderId; as well as further attributes from CommandContext (see http://www-01.ibm.com/support/knowledgecenter/SSZLC2_6.0.0/com.ibm.commerce.api.doc/com/ibm/commerce/command/CommandContext.html)
Appendix
Get in contact
Please contact us after the installation in order to setup an account to use the Adtelligence Personalization Engine IBM WebSphere Commerce plugin in your system. To request an account and further information write an e-mail to ibm@acceleraida.ai.