1. Introduction
Thank you for choosing the Personalization Engine. The Personalization Engine offers an AI-based solution for targeting your website visitors with dynamic and target group-relevant content. The aim is to noticeably increase your conversion rates. The engine adapts the content individually based on user information. This creates personalized experiences for each customer segment on your website that achieve your defined goals efficiently and quickly. It uses advanced optimization algorithms and artificial intelligence (AI), which you can use without any prior knowledge of programming or AI. In addition, the ACCELERAID platform offers you comprehensive reporting tools that provide valuable insights into the behavior of your prospects, customers and sales processes.
In this document you will find a detailed step-by-step guide using the example of a customer who wants to personalize his landing page for a new insurance product. Start personalizing now, generate more leads and increase your conversion rates with intelligent, adaptive websites.
2. First steps – How do I create an account?
2.1 Receive login data
Please inform your ACCELERAID contact person of the surname, first name and e-mail address of all persons who require access to the system. Your contact person at ACCELERAID will then set up the necessary accounts for you.
2.2 Activate and manage account
- As soon as your account has been created, you will receive an e-mail containing a confirmation link.
- Please click on this link to verify your e-mail address and create your password. Please note that the link is only active for 24 hours. If you wish to complete the verification process at a later time, please contact your ACCELERAID contact person to have your account reactivated.
- To add new accounts, make changes to existing accounts or delete them, please also contact your ACCELERAID contact person.
2.3 Forgot password
- If you have forgotten your password, simply visit the ACCELERAID login portal, which you can always find at https://KUNDENNAME-service.adtelligence.de. Click on “Forgot Password?” there.
- In the next step, enter your user name. This is usually a combination of the first letter of your first name and your surname, for example: Hans Mustermann –> hmustermann.
- After you have clicked on “Submit”, you will receive an e-mail with a link that you can use to reset your password.
2.4 Login
- Visit the ACCELERAID login portal, which you can always access at https://KUNDENNAME-service.adtelligence.de.
- Use your user name and password to log in to the software.
2.5 First steps in the software

Once you have successfully logged in, you will be redirected to the start page of the software. On this start page, you have a comprehensive overview of the following points:
- The performance and key figures of your current projects
- The number of visitors to your website
At the top of the window you will find the main menu. You can use this menu to navigate within the software and use all available tools.
For detailed information on how your software works, please visit your user manual, which you can find at the link provided. If you have any further questions, your ACCELERAID contact person will be happy to help you at any time.
3. Integrating the system into your website
To get started with personalization, the first step is to integrate the personalization engine on your website or landing page. The ACCELERAID software can be flexibly integrated and adapted to any type of website or content management system (CMS).
There are two basic methods for integration:
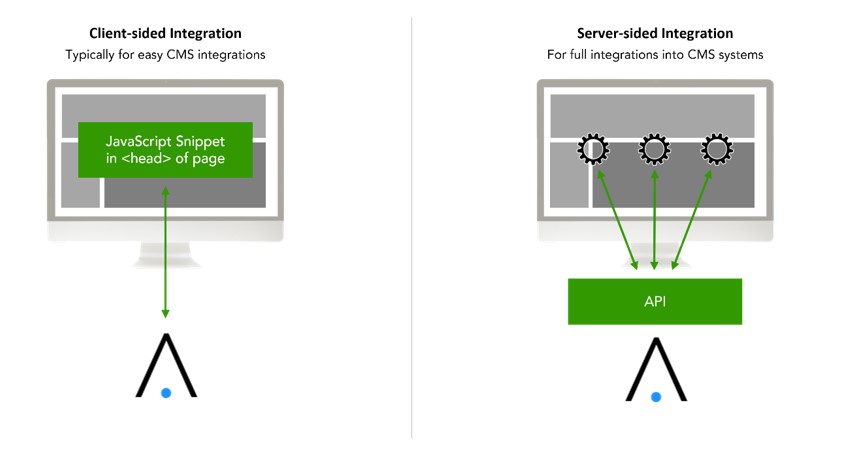
- Client-side integration: This method is platform-independent and uncomplicated. It involves inserting a JavaScript code into your website. You can download this code directly from the software (see section 4.1).
- Server-side integration: Complete integration into your CMS system is also possible.
In addition to these two standard methods, further integration options are available if required. Your ACCELERAID contact person will go through a list of questions with you in order to jointly determine the optimum integration solution for your company. Of course, you will receive advice and support throughout the entire integration process. You can find a link to our detailed technical instructions for integration here.
4. How to increase your conversion rate – a step-by-step guide using an example
In the following, we will use an example to show you how you can personalize a landing page for the product “sample product” and increase the conversion rate in just 6 steps. You can find even more details on the individual steps in our user manual.
4.1 Define a website to increase the conversion rate
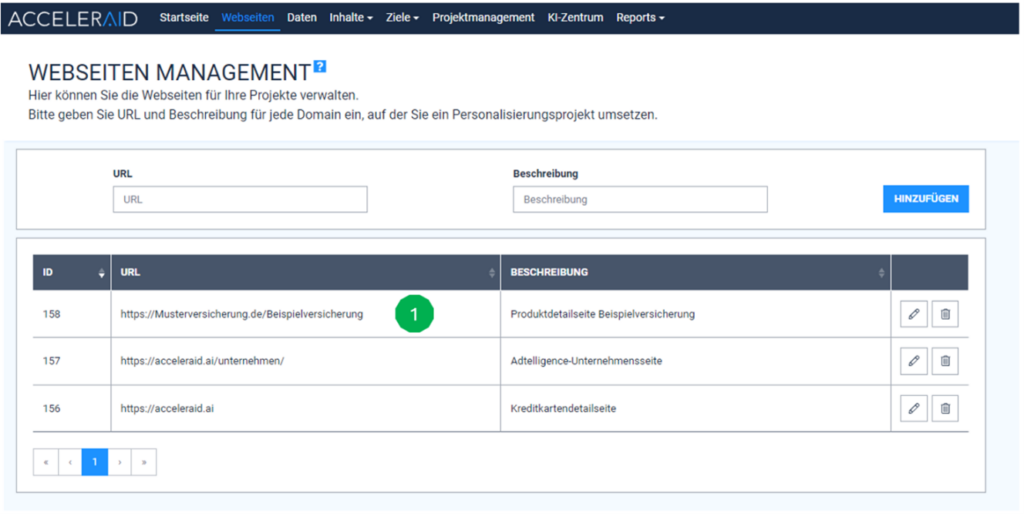
In our example, we assume that we are an insurance company and want to increase the conversion rate on the following landing page through personalization: https://musterversicherung.de/beispielversicherung
To achieve this, we must first enter the URL of the desired landing page, in our case https://musterversicherung.de/beispielversicherung, under ‘Websites’ in the ACCELERAID platform (Fig. 1) and save it.
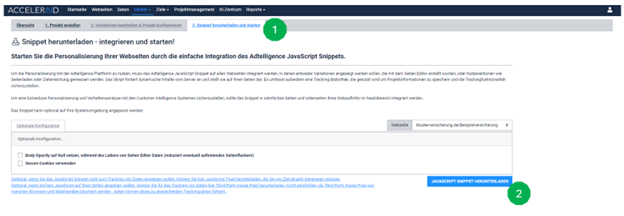
If you have opted for a client-side integration, you will next receive a JavaScript snippet. To do this, follow these steps:
- Under “Content”, click on “Page editor”.
- Now click on “Download and start snippet” (Fig. 1).
- To download the script, click on the blue button “Download JavaScript snippet” (Fig. 2).
- You can now integrate this downloaded script into the <head> of your website using copy-paste.
Follow the instructions in the user manual for further integration steps.
If you have opted for a server-side integration, please contact your ACCELERAID contact person for further details, or follow our “Instructions for server-side integration” here.
4.2 Define visitor data to increase the conversion rate
In the ‘Data’ menu item, you have control over the data to be collected and used for personalization and conversion increase. This section allows you to add, remove and edit data sources with a simple click on the respective logos.
Let’s take our insurance company as an example:
- We want to use the Google keyword entered by the user (Fig. 1)
- and the utm_Campaign parameter, which provides information about the campaign visited by the user (Fig. 2).
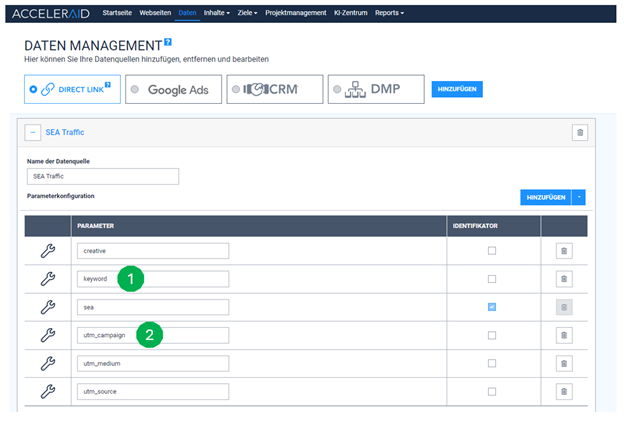
Once these parameters are captured and processed by ACCELERAID, this allows for more precise personalization for each campaign and keyword: Imagine creating four personalized versions of your sample landing page with different images, texts and layouts, each matching a keyword and/or campaign. By processing these two parameters, the ACCELERAID system can effectively identify the optimal variant for specific keywords such as ‘free travel insurance’ and campaigns such as ‘travel insurance benefits’ and present them to the user.
If you have connected other third-party systems in consultation with ACCELERAID, additional data source icons can appear here.
4.3 Defining goals for personalization
Every algorithm, every AI, needs a goal that it should optimize. Under the “Targets” menu item, you can now create various targets (Fig. 1) and give them both a description and a monetary value so that you can also evaluate the profitability of personalization in later reports. These goals are needed as soon as you switch on AI-based optimization for your projects.

Later in the process, you will also have the option of downloading tracking scripts for the various goals, which you can integrate into your website at the appropriate point. Conversion, for example, as an “on load” goal when loading the thank you page in the completion process.
4.4 Creating a new project
Once the URL of the landing page has been defined and the relevant data for personalization has been selected, the next step is to give the project a name. This is necessary as you can run several personalization projects in parallel.
To name your new project, you can proceed as follows:
- click on “Page editor” in the menu under “Contents” (Fig. 1)
- click on “Create project” (Fig. 2)
- enter the exact URL of the website, in our example the https://musterversicherung.de/ and the name of the project, in our example “Optimization example insurance”, and select the previously saved website (Fig. 3)

4.5 Creating a personalized variant of the landing page
Once a new project has been created, the next step is to create different variants of your landing page. There are two options for this:
- If it is part of your contract, ACCELERAID can take over the creation of the variants according to your specifications.
- Alternatively, you can use our intuitive WYSIWYG editor to customize the elements of your landing page yourself. By simply dragging and dropping, you can create personalized versions of your page in just a few minutes (Fig. 1). To do this, you can change the elements, upload new images or insert new text. You can find detailed instructions in the user manual.

Let’s assume that we have created the following variants of the landing page for our example using the WYSIWYG editor:

4.6 Start personalization
We are now ready to display the variants based on the parameters we have defined in order to increase the conversion rate. Through continuous testing, the AI algorithms will display the best variant at the optimal time and for the right customer or, in our example, keyword and campaign. To start personalization, we follow these seven sub-points:
4.6.1 Select website
Under ‘Websites’, we select the URL under which the personalized variants are displayed.
In our example, this is https://musterversicherung.de/beispielversicherung (see Fig. 1).

4.6.3 Define data sources
Under Data sources, select the traffic source and the trigger for whom and when the variants should be displayed; in our example, you would configure that the personalized variants should only be displayed if a customer came via SEA and arrives on the landing page with the parameter utm_campaign=SEA_ReiseBenefits. Otherwise, the standard page is displayed.
Alternatively, you could of course also select certain times, devices, locations, etc. as triggers. This step allows you to integrate different personalizations for one and the same landing page. For example, one personalization would only be triggered for users with the parameter utm_campaign=SEA_ReiseBenefits and another personalization only for the parameter “utm_campaign=SEA_Brand”.
In the personalization for the parameter utm_campaign=SEA_ReiseBenefits (Fig. 1), for example, you only show variants of the website on which you go into the travel insurance and its benefits and in the personalization for the parameter utm_campaign=SEA_Brand you put the brand in the foreground. This means that on one and the same landing page, you can algorithmically optimize all variants on the topic of brand and all variants on the topic of travel benefits.

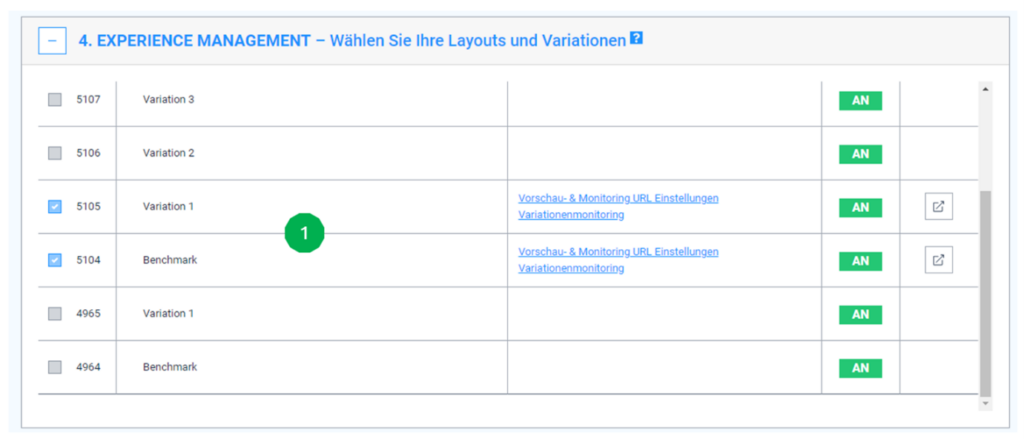
4.6.4 Assigning triggers
Under ‘Experience Management’, we can assign the individual variants to the triggers we have selected. In our example, we have selected the standard page (benchmark) and variant 1 (see Fig. 1).
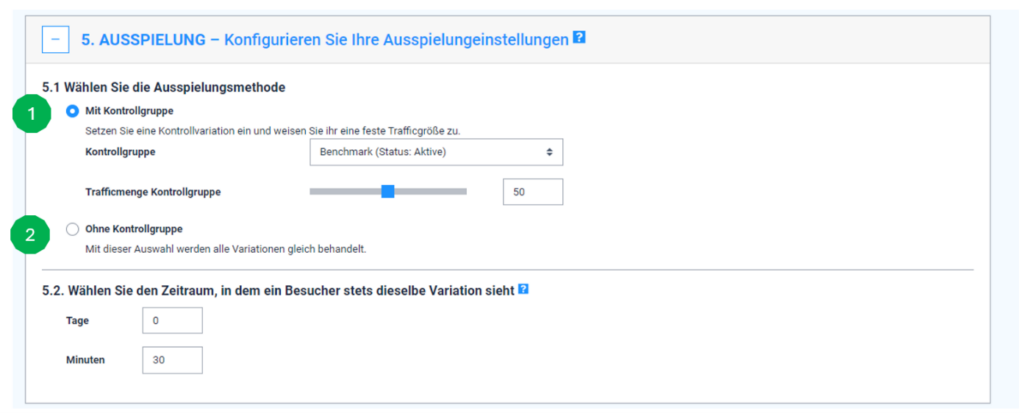
4.6.5 Define visitor distribution
Under the menu item “Display”, we define how the visits are distributed to the different landing page variants. There are two strategies to choose from:
- Benchmark project with a control group (Fig. 1): Here you can direct a certain, configurable percentage of visitors to your standard landing page. The remaining visitors are divided between the different variants. Please note that the optimization only affects the percentage that is allocated to the variants. As a rule, the option with a control group is selected at the start so that it is clearly measurable what effect personalization has compared to a simple static landing page.
- A project without a control group (Fig. 2): In this case, visitors are evenly distributed across all variants, including your standard landing page. This enables a holistic optimization of all variants, including your benchmark version. Here, it is no longer possible to clearly measure the effect of personalization compared to a static landing page, but the standard page is now also optimally displayed to the right target group and no more potential is “wasted”.
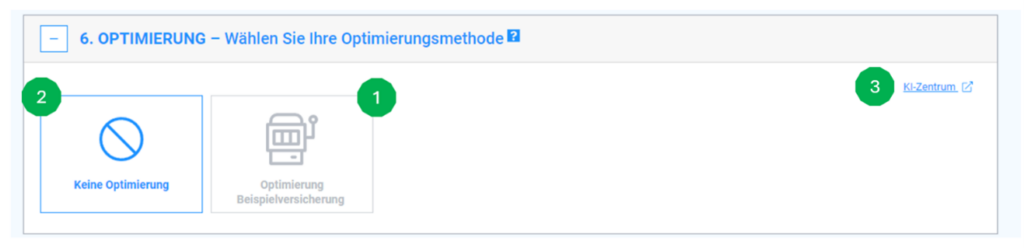
4.6.6 Defining the playout of variants
In the “Optimization” step, you can decide how your variants should be displayed. You have two options:
- AI-controlled optimization (Fig. 1): Select this option to have your variants played out by an intelligent algorithm. This algorithm continuously learns from customer interactions and sales, in our example lead generation for travel insurance, in order to constantly improve the performance of your landing page. If you choose this option and want to start directly with an AI-optimized playout, please click on “AI center” (Fig. 3) at the top right and continue with point “6 Use artificial intelligence for personalization and conversion increase” and then return here.
- Equal distribution (Fig. 2): With this setting, the variants are initially played out to visitors in equal proportions. This method is suitable for making a basic comparison of the different variants. After an “inventory”, the AI-controlled optimization is then usually started.
For detailed information on configuring the AI algorithm, you can find further instructions [here].
4.6.7 Summary
In the “Summary” step, you will receive another overview of your configuration and can now save it.

4.6.8 Set personalization live
Now we have finished setting up our personalization and can start it. You can do this by completing the following steps:
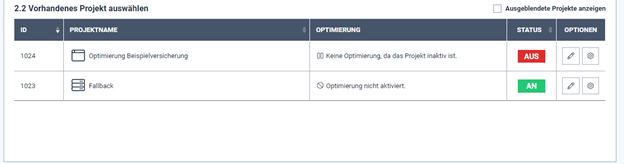
- Select the “Page editor” option in the menu (Fig. 1).
- Activate your project by setting the slider next to the project name to “ON” (Fig. 2).

With these two actions, the personalized variants of your landing page become active and visible to the corresponding visitors.
If you want to pause the project/playout of the personalization, simply activate the slider (Fig. 2) for your corresponding project again and set it to “OFF”.
5. The reporting functions for performance measurement
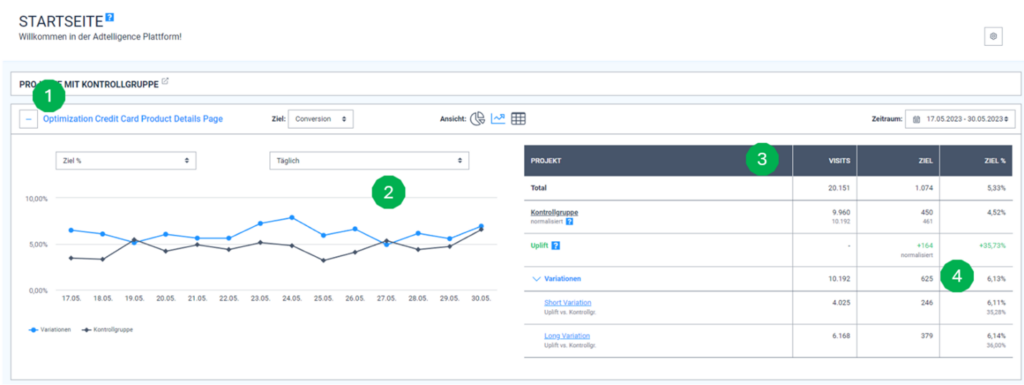
The performance of your most important projects (which you can define in the Performance Monitor – see point 4, Performance Monitor) is always displayed on the start page after logging in. When you open a project in the overview (see Fig. 1), the conversion data for the last 14 days is displayed by default. You can change this period at any time and display the data for the last 30/60/90 days or a freely selectable period.
If we have selected “A benchmark project with control group” in section 5.5, the control group as well as the personalized variants are displayed (see Fig. 2). Otherwise, you will see all the data for the variants and your standard page one below the other.
On the right-hand side of the dashboard, you will find detailed statistics on visitors, conversions and the conversion rate – both for each individual variant and for the control group (see Fig. 3).
The “Uplift” line is particularly informative (see Fig. 4). Here you can see directly how many additional conversions were achieved through personalization and what percentage this represents in comparison to the control group.
You can find more detailed reports under “Reports”. The following five reports are available:
5.1 Performance Report
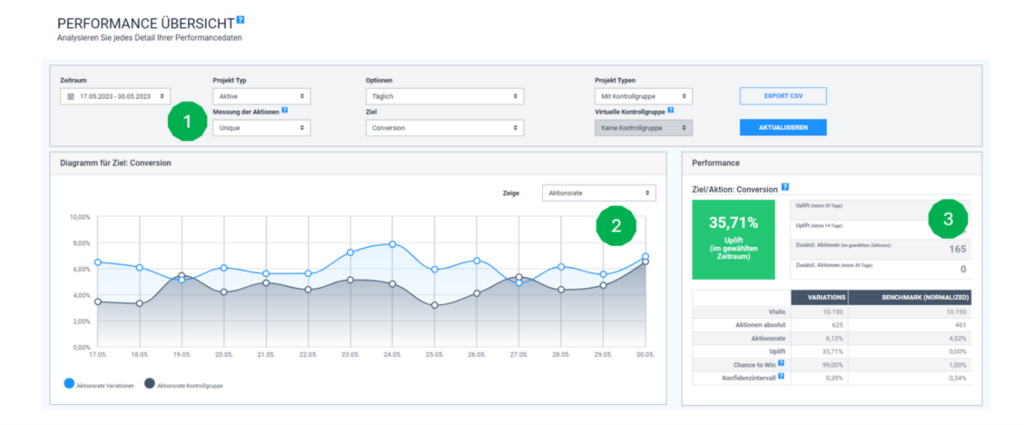
In the performance report, you have the option of analyzing the performance of each individual project in detail and according to your requirements. For example, you can view different time periods or specific conversion targets (Fig. 1). You also have the flexibility to adjust the display in the graph (Fig. 2), for example to visualize the action rate, the number of visits or the daily conversions.
Depending on your individual configuration of the report, you gain insight into the additional conversions generated as well as the uplift – the comparison to the control group or the benchmark in percent. Additional statistical data and findings are also displayed (Fig. 3).
5.2 Details Report
The detail report allows you to carry out an even more in-depth analysis. Here, for example, you can view all key performance indicators (KPIs), such as clicks or conversions (Fig. 1), separately for each individual parameter combination. This makes it possible to evaluate the performance of your variants in detail for specific combinations, such as utm_campaign=insurance, utm_medium=email and utm_source=bing (Fig. 2). This in-depth view allows you to analyze and understand the performance of your new variants down to the smallest detail.

5.3 Excel-Report
The Excel report is one of the most frequently used reports in the Personalization Engine. It offers you the flexibility to configure all the parameters you want to analyze yourself. You can define the time period for the report according to your needs. As soon as the report is completed, it is automatically and conveniently sent to you by e-mail. This function enables an individual and efficient analysis of your personalized data, adapted to your specific requirements and interests.

After you click on “Save” (see Fig. 1), you will receive a finished report within a few minutes. This is immediately ready for use and can be used directly for internal presentations. The quick availability and user-friendliness of the report enable efficient further processing and presentation of your data.
5.4 Performance Monitor
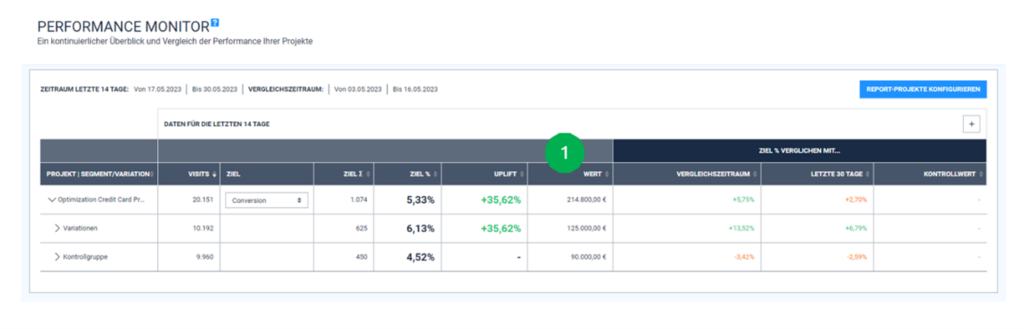
In the “Performance Monitor” report, you have the option of individually configuring the display of your projects on the start page. You can also define a value per conversion. This not only provides you with an analysis of the additional conversions generated by personalization, but also a direct evaluation of the additional revenue generated (Fig. 1). This function provides a comprehensive overview of the economic success of your measures.
5.5 KI-Report
ACCELERAID’s AI report is specifically designed for the evaluation of optimization projects. It addresses the frequent debate about the contribution of new designs and the influence of the AI algorithm and optimized playout on overall success. This report provides a direct comparison between the optimized playout (blue line) and a uniform distribution (grey line) across all visitors and variants. This allows you to clearly see what specific influence the optimized playout had on success and thus assess the effectiveness of the AI. The AI-based optimization effect (Fig. 1) describes the percentage uplift compared to a hypothetical evenly distributed playout and the overall effect (Fig. 2) describes the actual percentage uplift of the optimized playout compared to the control group.

All reports are explained to you in detail during the training sessions as part of the onboarding process. In addition, you will find detailed step-by-step instructions for each report in the user manual, which is available here.
6. Using artificial intelligence for personalization and increasing conversions
In most cases, a “Benchmark project with control group” is selected in section 4.6.5 Define visitor distribution. In this case, several personalized variants of the landing page you have created are displayed, distributed equally among your visitors, but still without optimization. In concrete terms, this means that with 100 visits to the page of a sample insurance policy and a configuration of the project as a benchmark project, 50 visitors will always see the standard page. The remaining 50 visits are divided evenly between the variants – so with two variants, 25 visitors see variant 1 and 25 visitors see variant 2.
ACCELERAID offers you two different types of AI optimization for the optimal distribution of the 50 visits across the variants:
- Optimization without user context: Here the visitors are distributed to the variants based on which variant is most effective.
- Optimization with user context: This involves an even more detailed distribution of visitors to the variants. Not only the best variant per user is displayed, but also the best variant per user and context parameter combination. In our insurance example, we would use the parameters utm_campaign and keyword for the optimization and the AI determines the best variant for users with, for example, the parameters utm_campaign=SEA_ReiseBenefits and keyword=travel insurance, or all other combinations of the values for these 2 parameters.
ACCELERAID usually starts with the first option to evaluate the general performance of the new variant and then adds context parameters to the optimization after a few weeks. You can also find out more about context-based optimization in the next section.
6.1 Optimization with context parameters
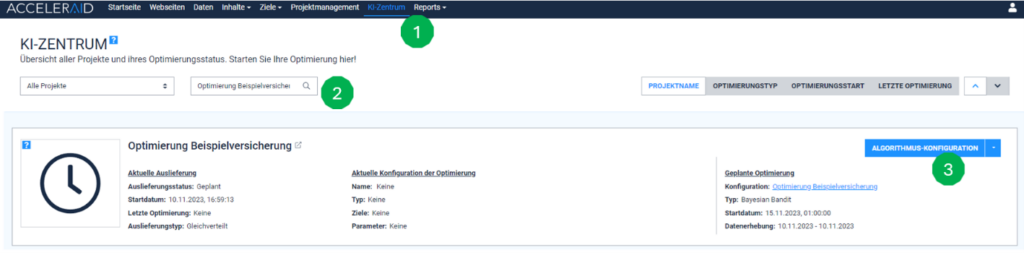
The following is an example of how an optimization with context parameters can be configured for the landing page of a “sample insurance policy”:
First, click on “AI center” in the menu (Fig. 1) and then select the appropriate project from a list of all projects (Fig. 2). To configure an AI algorithm, then click on “Configure algorithm” on the right-hand side (Fig. 3).
All previous configurations for the selected project are displayed on the following page. By clicking on “Add configuration” (Fig. 1), you can select one of the three AI algorithms and go to the page for the detailed configuration. The algorithms are:
- Neural network
- Bayesian bandit
- Reinforcement scoring
As a rule, we use the Bayesian Bandit to increase the conversion rate, as this is the algorithm that you can start with directly without much preparation. It is very robust, can cope with low traffic volumes and learns very quickly. The other two algorithms can also be used for special cases; your Acceleraid contact will advise you in detail during the process.

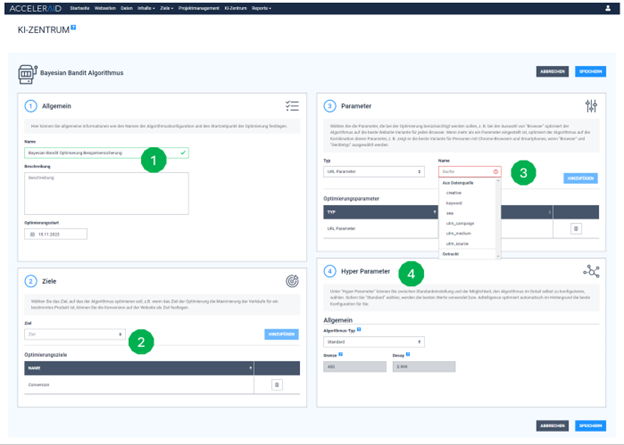
In our example, we use the ACCELERAID Bayesian Bandit to configure the optimization to increase the number of insurance contracts. To configure this algorithm, the following four steps can be taken:
- Add a name, description and start time of the optimization (Fig. 1).
- Next, select the target of the algorithm from a list of integrated targets (Fig. 2). You configured these individually in step “4.3 Define goals for personalization”.
- In the third step, configure the context that the algorithm should take into account. In our example, these are the parameters utm_campaign and Keyword, which you can select from a list of all integrated parameters (Fig. 3).
- In the fourth step, you have the option of making advanced settings. ACCELERAID offers an autopilot for this purpose, which was awarded the AI Champions Award 2021 and makes optimal settings in the background (Fig. 4). If you do want to do it yourself, you can, for example, control how important data from the past should be to the algorithm as opposed to data from the last few days. For special events, such as Cyber Week, you can instruct the algorithm to primarily only use data from the last 1-2 days for its decisions.
Further details on the advanced configurations of the algorithms can be found in our user manual. Once the configuration is completed and saved, the algorithm will start optimizing the project from the specified optimization start time and you can experience how the AI increases your conversion rate on a daily basis.